This post assumes you know how to create a basic SSRS report and link it to a SQL Stored Procedure.
We were starting to build up a fair number of SSRS reports that the users were running on an ad hoc basis. Initially I was emailing links to each individual report and people were saving them to their favourites.
It wasn’t long before I realised that a menu would be a much better idea. I had built SSRS menus in ASP.net / C# before but wanted a quicker, easier solution.
First thing was to organise the reports.
On the report server I created a “User Reports” folder. And within this a folder for each department (there are some lower level sub folders that have a higher privilege security setting, but the principle holds true no matter what level you go to).

For the permissions for each folder I created a corresponding Active Directory Group and gave permissions to that group (e.g. AD Group called SSRS_Finance, SSRS_IT, etc)
Next step was to create two SQL Tables to hold the Report Details.
Table one is Report Groups, simply used to group reports and provide a meaningful name for each group.

Table two holds the report details.

ReportID is simply an auto incrementing ID column
ReportGroupID is the Foreign Key to the ReportGroup Table
ReportName is the name of the report as stored on the SSRS Server with the relative path from the User Reports folder. E.g. if you look at ReportID 8, this report is in the Finance Folder then the Finance_Level2 subfolder and is called RAY_Ledger_Transactions.
DisplayName is the Name that the User will see in the Menu
Report Description shows next to the DisplayName to clarify what the report shows (if needed)
NB: I avoid using spaces in the report names or folders for simplicity.
We also need a stored procedure to return the information we want to see in our Menu (we could hardcode this in the report dataset but I prefer to use a stored procedure):
[sql gutter=”false”]
CREATE PROC [dbo].[RAY_UserReportsMenuSp]
AS
SELECT
RG.ReportGroupID ,
RG.GroupName,
R.ReportID ,
R.ReportName ,
R.DisplayName ,
R.ReportDescription
FROM dbo.Report R JOIN dbo.ReportGroup RG
ON R.ReportGroupID = RG.ReportGroupID
ORDER BY RG.GroupName, R.DisplayName
GO
[/sql]
We are now ready to build the Menu.
This is simply a report that uses the information stored in the tables to provide a menu with clickable links to each report.
One important thing to note is that the Menu must be in the root folder directly below your subfolders, in this case “User Reports”. If this is not the case, you would need to modify the ReportName as this is used as the link to the reports (as we will see in a minute).
Open Visual Studio (or your editor of choice) and create a new report Menu, that has a data source that links to the database where your tables and stored procedure are located.
Create a dataset that calls the data from the stored procedure.
Add a Tablix to the report and add the columns as below:

To get the hyperlink on the Report Column (which will launch the report when you click on the DisplayName) you need to open the textbox properties and on the action tab set the properties as below.
This tells SSRS to go to the report specified in the ReportName when you click on the DisplayName).

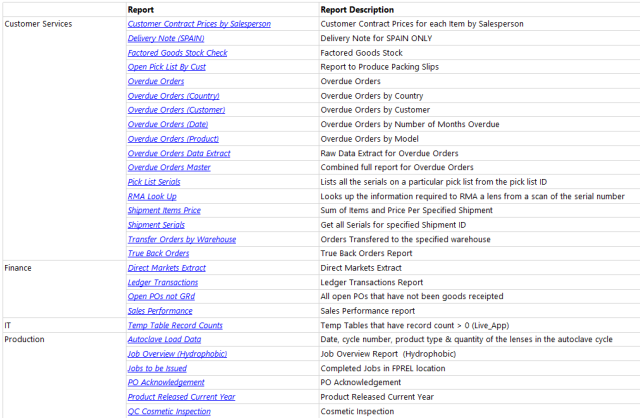
Your final Menu should now look something like the one below:

You can then send the URL for this report to all your users.


